How to automate Azure AD Application Proxy?
You want to implement AzureAD application proxy to put in place zero trust controls but want to do it in an automated fashion, how do you this? I'll take you through it.

This is part 1 of a 2 part series. Part 2 will be about configuring the applications for use with the proxy.
Zero trust security is a concept that has gained significant attention in recent years. It is a security model that assumes that every request, whether internal or external, is a potential threat. To mitigate these threats, zero trust security requires strict identity verification and access controls.
One tool that can help implement zero trust security is Azure AD Application Proxy.
In this blog post, we will explore how Azure AD Application Proxy can be used to implement zero trust security and provide secure remote access to internal web applications.
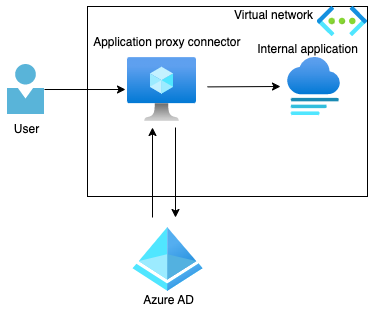
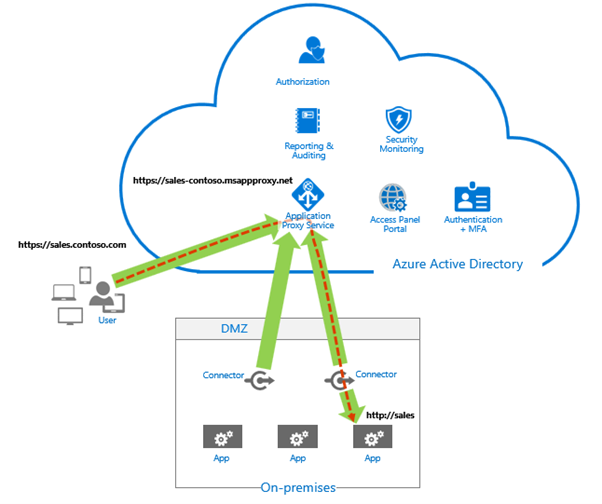
Azure AD Application proxy is often thought of as just for on-premises applications but it works perfect for anything running in your virtual network too whether that's something running on a Virtual Machine or on a Kubernetes cluster.
In this blog series I will expose a demo virtual machine using Azure AD Application proxy and it will all be automated end to end.
- I will be setting up the connector on a Windows Server Core 2022 Virtual Machine.
- I will use Terraform as my Infrastructure as Code poison of choice for the Azure resources.
- I am deploying to a tenant with the required license for AzureAD application proxy (Azure AD Premium P1 or Premium P2)
For the full configuration see the GitHub repository: timja/azuread-application-proxy-demo
Application proxy connector
Prerequisites
- Azure CLI installed and logged in with
az login - Your user account needs the AzureAD role: 'Application Administrator'
- Terraform installed, (I used 1.5.0 here)
Creating the connector
Start by creating a directory to work in and entering it:
mkdir azuread-application-proxy
cd azuread-application-proxy
Then we are going to start by creating some variables, change them according to your needs:
variable "prefix" {
  default = "app-proxy"
}

variable "location" {
  default = "uksouth"
}

variable "vnet_address_space" {
  default = "10.1.0.0/24"
}

variable "subnet_address_space" {
  default = "10.1.0.0/25"
}

variable "size" {
  default = "Standard_D2ds_v5"
}

locals {
  tags = {}
}
Next we will create a resource group:
resource "azurerm_resource_group" "this" {
  name     = "${var.prefix}-rg"
  location = var.location

  tags = local.tags
}
Then a Virtual Network and Subnet:
resource "azurerm_virtual_network" "this" {
  name     = "${var.prefix}-vnet"
  location = var.location

  address_space       = [var.vnet_address_space]
  resource_group_name = azurerm_resource_group.this.name

  tags = local.tags
}

resource "azurerm_subnet" "this" {
  name = "app-proxy"

  address_prefixes     = [var.subnet_address_space]
  resource_group_name  = azurerm_virtual_network.this.resource_group_name
  virtual_network_name = azurerm_virtual_network.this.name
}

resource "azurerm_network_interface" "this" {
  name                          = "${var.prefix}-nic"
  location                      = var.location
  resource_group_name           = azurerm_virtual_network.this.resource_group_name
  enable_accelerated_networking = true

  ip_configuration {
    name                          = "${var.prefix}-ipconfig"
    subnet_id                     = azurerm_subnet.this.id
    private_ip_address_allocation = "Dynamic"
  }

  tags = local.tags
}Now that we have all the boiler plate out of the way we all create a Virtual Machine:
resource "azurerm_windows_virtual_machine" "this" {
  name                  = "${var.prefix}-vm"
  admin_username        = var.prefix
  admin_password        = random_password.this.result
  location              = var.location
  network_interface_ids = [azurerm_network_interface.this.id]
  resource_group_name   = azurerm_subnet.this.resource_group_name
  size                  = var.size

  patch_mode = "AutomaticByPlatform"

  os_disk {
    caching              = "ReadWrite"
    storage_account_type = "Standard_LRS"
  }

  source_image_reference {
    publisher = "MicrosoftWindowsServer"
    offer     = "WindowsServer"
    sku       = "2022-datacenter-azure-edition-core"
    version   = "latest"
  }

  tags = local.tags
}Looks simple doesn't it, well it is!
We aren't done yet though we need to install the connector on the Virtual Machine, we will do that with a Virtual Machine extension:
resource "azurerm_virtual_machine_extension" "this" {
  name                 = "app-proxy-onboarding"
  virtual_machine_id   = azurerm_windows_virtual_machine.this.id
  publisher            = "Microsoft.Compute"
  type                 = "CustomScriptExtension"
  type_handler_version = "1.9"
  protected_settings   = <<PROTECTED_SETTINGS
    {
      "fileUris": ["${var.script_url}"],
      "commandToExecute": "powershell -ExecutionPolicy Unrestricted -File bootstrap-app-proxy.ps1 -TenantId ${data.azurerm_client_config.this.tenant_id} -Token ${data.external.this.result.accessToken}"
    }
    PROTECTED_SETTINGS

  tags = local.tags
}

variable "script_url" {
  default = "https://raw.githubusercontent.com/timja/azuread-application-proxy-demo/HEAD/Bootstrap-Application-Proxy.ps1"
}

data "azurerm_client_config" "this" {}


data "external" "this" {
  program = ["bash", "${path.module}/get-access-token.sh"]
}
You can examine the script yourself at Bootstrap-Application-Proxy.ps1.
The access token is be retrieved by running the get-access-token.sh script which runs:
az account get-access-token \
  --resource-type 'aad-graph' \
--scope 'https://proxy.cloudwebappproxy.net/registerapp/user_impersonation'There's other methods of getting the access token documented on Create an unattended installation script for the Azure Active Directory Application Proxy connector but they are all a lot more complicated and difficult if you aren't running on Windows.
Running the terraform
You should now have all the files needed and if you don't you can just grab them from timja/azuread-application-proxy-demo.
We're now going to run the terraform:
terraform init
terraform plan -out tfplan
Review the plan and if it looks good approve it:
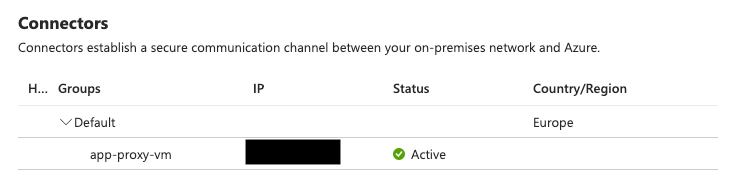
terraform apply "tfplan"All going well it should succeed and if you go to Application Proxy in the portal then you should see:
Part 2
Coming soon, subscribe to get notified when it's available
References
These are posts I came across that were helpful to me: